Hey lovelies! Happy New Year's Eve! I've been meaning to post this for a while now, and it's probably not a great time to post (ie, everyone's busy and won't see it) but I really wanted to share it! {More after the jump}
When I first saw the crystal bib necklace from Banana Republic's Anna Karenina collection I knew I had to make it. It's also the same as Ruth Bader Ginsburg's infamous dissent collar - now you can make your own! I thought it was begging to be DIY'd, and I'm surprised that no one has done it yet (that I'm aware of at least) So, here's the how-to:
You'll need: a paper template, drawn loosely and cut out for just the overall shape, a piece of felt, 6mm, 8mm, and 11mm flat backed rhinestones, jewel glue, silver glitter puffy paint, scissors, straight pins (not shown), black ribbon (not shown), black thread and needle (not shown).
Pin your template to the back of your piece of felt and then cut it out. Again, this is the rough shape of the necklace so the final shape will be refined later.
Begin laying out your pattern, I chose to do the outline of the large rhinestones first.
Apply a small amount of jewel glue to the back of the rhinestone and put it back in place. {Please excuse my ragged cuticles! But how adorable is the polish? It's Revlon's Popular}
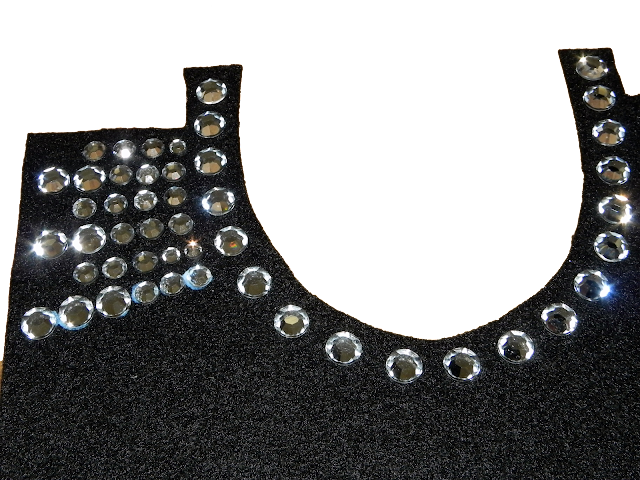
Once the large outline is glued into place, begin the horizontal rows. Lay them into place, and then glue them one at a time in their place.
Keep going, it will take time and patience.
All done with the rhinestones! Let it dry according to the glue's instructions, and use a warm iron to the back if so required now.
Apply the dotted outline using the silver glitter puffy paint.
All done! Now let it dry, then cut out around the borders.
And this is what you'll have. Now we just need to attach the ribbon closure.
Cut a yard of velvet ribbon in half and singe the edges with a lighter to prevent fraying. Hand stitch each piece to either side with the needle and thread, make sure it's tightly secured!
Tie the ends together in a pretty bow, and voila!
I think this is a great way to jazz up a plain tshirt, as well as an addition to a fancier ensemble. And surprisingly, cost about $15 to make (compared to BR's $80 price tag).
xx
Lia


adore it!
ReplyDeletexo, megan www.tfdiaries.com
Really great "inspired by" DIY! I seriously had to look at the top photo twice to make sure it was the DIY. This will be my first post of 2013 because all the other blogs are just posting resolutions so THANK YOU! Posted the top photo and a link back to your blog on truebluemeandyou on Tumblr.
ReplyDeleteWow, it's so much like the original its crazy!
ReplyDeleteWonderful post, though you will need patience for those rows ^_^
This turned out so well! LOVE!
ReplyDeleteWay to start the year strong! Love this Lia, total knockout!
ReplyDeleteWhat a great project! I think I'll try it!
ReplyDeleteGinny
mynewfavoriteoutfit.blogspot.com
WOW! Lia this DIY was only $15? You did an amazing job recreating it, and I cannot believe how impressive it looks in terms of how much time one would slave away while constructing it!
ReplyDeleteThis is gorgeous Lia! Great job!
ReplyDeletexoxo
Cathy
Amazing!!
ReplyDeleteThis turned out great! So pretty.
ReplyDelete-Erin @ DIY On the Cheap
WOW!! I remember seeing this on instagram and I didn't come to check it out right away. This is seriously magical!! It looks like the real one.
ReplyDeleteso beautiful, so easy, well done!!!
ReplyDeleteThat's such a good idea and it came out great. This is a really creative way to try out the statement necklace trend without spending a ton. Definitely going to try it!
ReplyDelete