-->

Tuesday, November 29, 2011

DIY Dipped in Snowflakes Glittered Ornaments

Hey lovelies!  Yes, I'm still at it with my ornaments, and y'all haven't seen anything yet!  Yesterday you saw my DIY Prada Inspired Paillette Ornaments.  Today I've jazzed up some teal ornaments I picked up.  I wanted them to look like they had been dipped in snowflakes, and I remembered the thick, chunky silver glitter I initially picked up for my DIY Miu Miu Inspired Glitter Loafer Pumps.  Here's the how to:


{More after the jump}


Monday, November 28, 2011

MonDIY ~ DIY Prada Inspired Paillette Ornaments

Hiya lovelies!  Ahhh it's Monday (sigh) and the long weekend is behind us.  I spent a lot of the time crafting, and the fruits of my labor are revealed! Inspired by the abundance of paillettes gracing Prada's looks, these may be my favorite ornaments ever!  I decided to go super girly this year, getting a white tree and adorning it in fuschia, teal, purple, and lime green.  It's not done yet, so please stay with me this week, and I'll show you how to make some knock out ornaments!   {More after the jump}


Monday, November 21, 2011

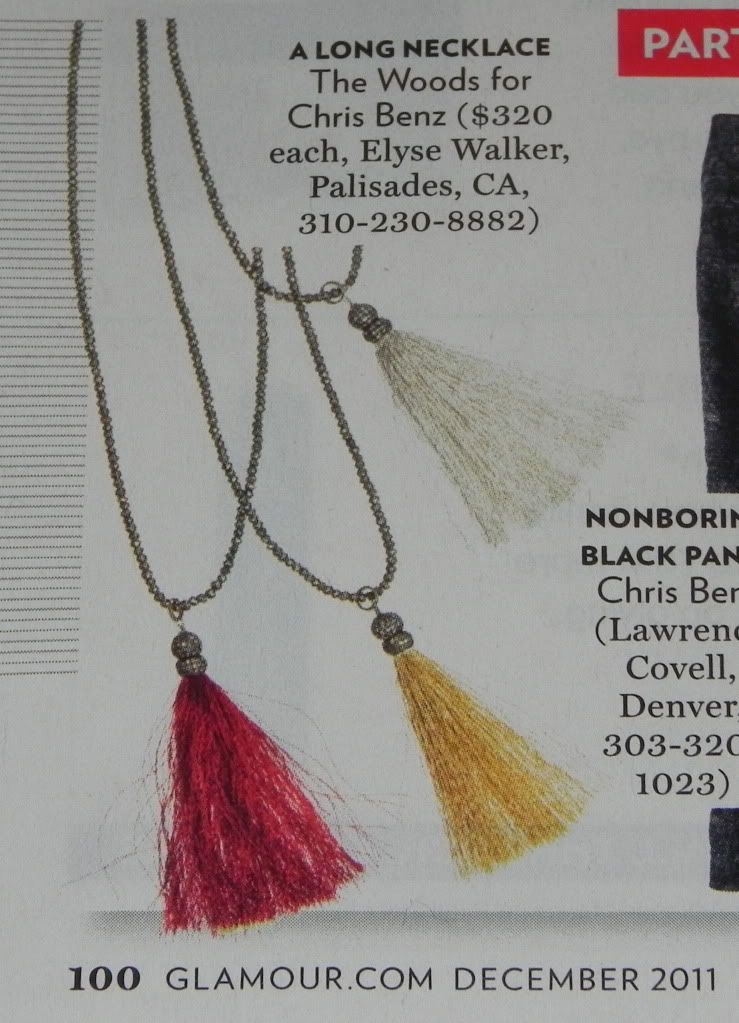
MonDIY ~ Chris Benz Inspired Tassel Necklaces on Fashions Blogs

Hiya lovelies!  So I'm working on an epic DIY, but alas, it's not done yet.  In the meantime, why don't you head over to Fashions Blogs and see the amazing DIY I did!  Here's a peek at this inspiration:


Ok, now head over to my post on Fashions Blogs and let me know what you think!

xx
Lia

Wednesday, November 16, 2011

My November Birchbox ~ What I Got

Hiya lovelies!  I got my Birchbox in yesterday and couldn't wait to share it with you.  I love seeing what everyone else gets in their boxes and usually it's totally different than mine.  So, here's mine:


 I must say after seeing everyone else's box, I thought mine would be rad.  I'm a little disappointed though.
Apparently Guerlain revamped its classic Shalimar scent.  It smells slightly better than the original, which smells like an 80 year old woman. {I used to work in fragrances at Burdines (now Macy's), and seriously only the elderly bought Shalimar.}  So this just smells like a 65 year old.  Definitely not for me.
This month's bonus treat was two coasters, similar to those you'd find at a bar, just without a beer logo on it.  Cute though.
I love lotion and I haven't tried the Kimono Rose scent yet, but the eucalyptus scent reminds me of men's soap.  It is a lovely, rich lotion though.
After falling in love with Anastasia's mascara, I was stoked to try the lip gloss.  It's really shiny, and a lovely color.  It's pretty thick and sticky though.  I like the flexible spatula applicator the best though.
Finally the Keratase hair oil.  This can be used in a variety of ways according to the packaging.  The scent is amazing and it really leaves my hair so soft.  And I have super dry hair, so that says alot.  The full size is a little pricy at $54.  We'll see how I feel about it after I keep using it :)

So, now I want to hear from you.  Did you receive any of these products in your Birchbox?  What did you think of them?
xx
Lia

Decor DIY ~ Colorful Knick Knacks

Hiya lovelies!  Today I thought I'd share a simple and eye-catching decor DIY.  It's a great way to add a punch of color to any room's decor.  Here's what you'll need:
I picked up the shells at the thrift store and the owls at Target.  I chose a bright red and a light teal spraypaint.  Follow the directions and spray until you get the desired coverage (I did three coats, letting each coat dry thoroughly before applying the next).
The lovely shells now grace my mantel.
Which perfectly complement my porcelain sand castle :)
And my owls look lovely guarding my TV.  I bought the purple glass one at TJ Maxx.

This could be done on pretty much anything.  Pine cones, thrifted children's toys, whatever your heart desires!

What do you think would be a fun and whimsical thing to spraypaint and use as decor?
xx
Lia

Tuesday, November 15, 2011

Shopping Haul ~ H&M Denver and More!

Happy Tuesday lovelies!  Can you believe that there hasn't been an H&M in Denver, until last week that is.  It opened downtown on Thursday, Nov. 10.  So I took a half day on Friday to check it out and I am so glad I did!  Here's what I got, along with some other killer deals I got Friday and Saturday at Colorado Ski & Golf, Gap, and Ann Taylor.

You can see my head in this pic, sorry I accidentally shot the video in HD :(


This is the metallic purple sweater and black shorts, I snapped a pic while trying it on.  Cute, huh?

Here's the link to the Ann Taylor event I attended where I first saw the fringe blouse, as mentioned in the video.

Did you take advantage of any of the amazing sales going on?

xx
Lia

Monday, November 14, 2011

Tuesday's Tips ~ How I Scored Miu Miu Pumps for $40 and How to Stretch Your Leather Shoes

Hiya lovelies!  So today I thought I'd share with you how I scored my amazing Miu Miu pumps, seen in yesterday's post.  
I got them at a high-end consignment boutique in Ormond Beach, FL, called Miss Priss.  They were brand new, and only $40.  I'm guessing they retailed for over $500. Insane, right?  I'm such a fan of thrift and consignment shops because of steals like this. My tip today is to go to your nearest thrift or consignment shop and sift through what's there; you never know what you'll find!

I've got another tip for ya too :)  Sometimes those new leather shoes are a wee bit tight.  Wear them around the house for about an hour while wearing socks with them and it will stretch them out.  Now this will only work if they are only a little tight.  If they need some major stretching, either take them to a cobbler, or give up on them.  This has worked like a charm with nearly every pair of shoes I own, and I swear by it.

What's been your best thrift/consignment store find?
xx
Lia

MonDIY ~ DIY Miu Miu Inspired Glitter Pumps

Hey lovelies!  Hope you're having a great start to your week.  As I mentioned in today's earlier post, I have another DIY for you today.  Hope you're as excited as I am!  This one was a learning process.  And by learning I mean do not use any other glitter than Martha Stewart's.  Period. 
I think we've all been coveting the glitter Miu Miu pumps, I sure know I have been.  Alas, there's no way in hell I'm about to drop $522 (hey there's on sale from $675!) on a pair of trendy shoes that will be worn for less than a year.  Here's our inspiration:
And here's how you can get it for $500 less than that great sale price :)
I bought these heeled loafers from the thrift store for $6 and they had no signs of wear!  I also used JoAnn's brand of glitter, which is not meant for this project.  So learn from my mistake!  I mixed the glitter and Mod Podge in the bowl and applied two coats with the foam brush.  Two chunky uneven coats.
And I had this mess.  So a quick trip to Michaels and....
I grabbed Martha Stewart's silver glitter, as well as some silver metallic acrylic paint.  I used my xacto knife to cut off any large chunks of glitter, and then I mixed the new glitter with Mod Podge and applied several coats.  
You can see where I applied the silver paint, and how fabulously sparkly these shoes are!
And this is my finished product!  Altogether, I spent about $22 for the supplies, a full $500 less than the sale price, and I will have no problem if I only wear these for a few months!

Have you embraced the Miu Miu glitter heels trend?  Would you rather spend the money on the real deal or make your own for a fraction of the cost?

xx
Lia

MonDIY ~ DIY Sequin Bow Shoe Clips on Fashions Blogs

Hi lovelies!  I hope you had a fabulous weekend!  Mine was a little cray-cray.  I'll write about it later, after I get the pics off the hubs' camera :)
Today is your lucky day.  You'll be getting 2 DIYs from me today.  One will come tonight, but for now I'll share my post from yesterday on Fashions Blogs, some sequin bow shoe clips. This was a fun and easy DIY and it includes a bit of shoe porn.  You may see these shoes again in tomorrow's post...


What do you think of these?  They came out kinda cute I think and are a whimsical touch to any shoes :)

xx
Lia

Friday, November 11, 2011

Warm Balsamic n Bacon Dressing Salad Wrap ~ A SnS Recipe

Hiya lovelies!  I wanted to post this earlier, but I was a bit preoccupied today ;)
I'm a salad fanatic.  I could eat salads for meals everyday, and not because they are healthy, but because I love them.  This is one of my favorite recipes, I actually had it for dinner the other night.  It's easy, and I almost always have all the ingredients on hand.  Here's what you'll need:
Spinach or spring mix, bacon, onion, brown sugar, feta cheese, balsamic vinegar, olive oil, salt, pepper, lemon, flour tortillas (I like the spinach ones!).
Cut up 3 strips of bacon into little pieces and start cooking them.
When they are about halfway done, I add about 1-1/2 slices of onion, cut in half.  Cook until done.
While those are cooking, I take about 2 handfuls of spinach and cut it into smaller pieces.  Put in a large bowl.
Remove the pan (temporarily!) from the burner.  Add about 2-3 tablespoons of olive oil, 2-3 tablespoons of balsamic vinegar, and about 1-1/2 teaspoons of brown sugar.  The crucial part here is to get the vinegar in without it splattering everywhere.  I pour it directly into the oil, off the burner.  Finally, put about 1/2 teaspoon of each sea salt and freshly ground pepper.  Let it boil for about 2 minutes, or until it thickens slightly.
Pour it over your bowl of spinach.  Add however much feta you'd like; I like an insane amount.  Squeeze a lemon wedge over the top.  Mix well.
Rinse out the pan well and put it on a burner, over medium heat.  Add your tortilla, moving it around.  Heat it on each side for about 30 seconds.
Put your salad in the middle of the tortilla, I use a spoon to do this.
Wrap it into a burrito, and enjoy!  This makes a great easy lunch, or dinner if you're like me :)
Will you make this?  Let me know how it comes out!
xx
Lia

Tuesday, November 8, 2011

Tuesday's Tips ~ How to Get Free Beauty Products for Travel

Happy Tuesday!   Today I'd like to share some of my tips with you on how to save valuable suitcase real estate while traveling!  Ever notice how much space your toiletries take up?  Even putting your hair care products into those small bottles, it still takes up a lot of space.  Here's how I do it.  I sign up for free samples and save them aside for when I travel.  So simple and they seriously take up such little space.
My current stash of samples includes hair care, body wash, lotion, face cream and cleansing cloths.
Alot of you (if not all) are familiar with Birchbox and receive their samples.  I go beyond that to get these.  There are several blogs and websites that alert you when there's a sample opportunity.  For example, All You magazine sends a daily email with a sample of the day.  That's how I've amassed all of these.  Sometimes it's a heads up about a coupon on Facebook for a free product for the first however many people, other times, it's instructions to go to a product's website and receive a free sample.  I highly suggest you all do this! My most recent score was this:
I love this fragrance and wear it so much!  I also get free fragrance samples when I order online from Sephora, those travel perfectly as well and I don't need to worry about hauling my huge bottles of perfume with me!

So what's the takeaway here?  Sign up for the daily emails and get your samples!  It's a great way to try products for free, and it really helps to use them when traveling!  Hope this helps you!

xoxo
Lia

Monday, November 7, 2011

MonDIY ~ DIY Boot Legwarmers on Fashions Blogs

Hello lovelies and happy Monday!  I'm thrilled to announce that I'll be writing a weekly DIY column on Fashions Blogs called "Lazy SunDIY Afternoon"; I hope you all will check it out!  So today, I'm linking you to that post of mine, make sure to check it out!  Leave some love there if you like what you see, and if you have anything you'd like me to DIY, please let me know in a comment!

http://fashionsblogs.com/lazy-sundiy-afternoon-diy-boot-legwarmers/


xx
Lia

Thursday, November 3, 2011

Balsamic Marinated Steaks ~ A SnS Recipe

Happy Friday eve!
I'm going to let y'all in on a little secret.... I love to cook.  Now by cook, I don't mean bake.  Although I make a killer apple pie including crust.   I love to cook meals, especially main courses.  Now I am a carnivore.  I love meat.  Especially red meat.  My doctor keeps warning me that I will have cholesterol problems, but I don't yet.  I also love Mediterranean style cooking.  And by Mediterranean I mean Green/Italian.  All my Greek cooking I learned from my Yiayia.  The rest?  I'd watch my stepdad cook while I was growing up, and he would cook the best Italian inspired food.

So there's my background.  As I get older, I play around and fine tune my own recipes.  One thing I've discovered is how much I love balsamic vinegar on everything.  I think I picked that up from my stepdad.  So this is my favorite way to marinate beef.  I pour some in the pan when I make a roast, but my favorite use is to marinate steak in it.  So here's my quick and easy balsamic marinated steak.
I have two boneless NY strips here that I've poked some holes in with a fork so that the marinade will get inside the meat.  I also use EVOO.
Step one: poke holes in the steak with a fork.
In a large ziploc bag, put about 2-3 tablespoons of each olive oil and balsamic vinegar.
Then add about a teaspoon each of sea salt, oregano and basil, followed by about half a teaspoon of pepper.
Add your steak(s).
Shake shake shake.  Then put it in the fridge, flipping occasionally.  Marinate it for at least 20 minutes, up to overnight.  Then throw it on the grill for about 20 minutes, cooked to your liking.  I like mine rare / medium rare, so sorry if this pic grosses you out :)
I serve this with baked potatoes and corn or a salad.  My fave meal!
What's your favorite way to cook?

xx
Lia

Wednesday, November 2, 2011

Decor DIY ~ Framed Shell Art

Happy hump day!  Today I've got a cute and easy decor diy for ya!  I've confessed my love of shells before, and my condo is full of shells!  How cute is this framed shell?  Most shells end up on a surface, a shelf, a table, etc.  I wanted to find a way to hang up a shell, but not just gluing a hook to the back of it.  When this picture frame broke, I knew what to do. 
All you'll need, plus some E6000 glue, not pictured.
The best part about this frame was the particle board because I could spray paint it!  I really like how the paint didn't adhere to all of the wood, even after several coats.  It gives it a more rugged/rustic look.
When the paint has fully dried, reassemble the frame.
Using E6000 glue, affix the shell to the center of the frame.  Let dry overnight.
So pretty!
Here's the finished product, proudly on display above my mantel.  Don't you love the framed palm tree pic too?  That was taken by the lovely Megan, of The Frugalista Diaries fame.  This goes perfect with my beachy decor and best yet, cost absolutely nothing!

xxooxoxo
Lia

Related Posts Plugin for WordPress, Blogger...